Have you ever thought of the possibilities to force (literally) all developers in your team to produce quality code? And what can be an objective measurement for quality? I am sure all of us have own opinion on this subject. Well, to me a good code is code which works flawless (as good as it gets, at last we are all human beings and making mistakes is just natural), code which is easily extensible and scalable, and code which is developed in the estimated terms (LOL I sound like PM).
Many of us have tried different approaches to accomplish that challenging goal. There are plenty of technologies that imply to separation of concerns. And despite this, a good high-level architecture doesn’t lead to good low-level architecture design by default, hence to the development of quality code. I can say it this way – no matter what one can chooses and designs, there is always pretty good chance someone to screw up your ideas. But, think about how hard (close to the impossible) would be to cover crappy code with unit tests…
That was mine motivation for scripting this article. I made up the weird idea to develop pre-commit hook which forbids committing of csharp code files if they don’t follow some code coverage policy. From one side this is performance overkill. Every time that someone commits code to the svn repository, an execution and parsing the results of all unit tests is performed (if the assembly is configured to be checked for code coverage). In case of mass commit, the unit tests are run once only and their results are reused for every file from the pool of pending files to commit. From other side – this is a fairly good chance to stop and fix the things at the beginning, before it becomes a way too late and messy.
I know that there are “things” called continuous integration tools which might be decent solution too. But this a step further than the subject of the current discussion. Let’s say that I love being extreme…Anyway, in this article I am going to review how we can check certain classes and assemblies for desired code during the commit operation. So, you can take this more like idea and to figure out whether this works for you or not. I am not putting this in your face saying – that is the way things should happen. In this article you can at least find how to examine code coverage results built with MSTest. So at last you may find something helpful here.
Straight to the subject.
SVN pre-commit hook is run when the transaction is complete, but before it is committed. Typically, this hook is used to protect against commits that are disallowed due to content or location (or in our case – committing policy inconsistence). The repository passes two arguments to this program: the path to the repository, and the name of the transaction being committed. If the program returns a non-zero exit value, the commit is aborted and the transaction is removed. You can then invoke this on pre-commit by adding a pre-commit.cmd file to the hooks folder of the repo with the following line:
[path]\PreCommit.exe %1 %2
Code coverage can be run and examined with every code-coverage tool. For the purposes of this article I use MSTest and its performance tools for building code coverage results.
On every commit, a code coverage policy is been checked and if there is a violation, the commit operation is aborted. It doesn’t matter if you are trying to commit one or one hundred files. If one fails, all fail. Fair enough…think twice what code you are about to commit.
Technically in order to fulfill our goal, we need to get the file which we are going to commit, to get the assembly to which it belongs, to run the code coverage, to get its results and to parse them checking if there are failed tests and if not, are the code coverage results the same as we want them to be. If the results don’t meet our expectation, we cancel the entire commit operation and send email to the appropriate person (it is configurable).
In order to keep all the preferences (policies) configurable (as much as possible), we read them from xml files, so once deployed, the hook can be easily tuned according the project for which it is used.
In the examples I use the source code of my article Unit testing MVC.Net. You can download the source code of this article it and try integrate it with the pre-commit hook of this article.
Let’s review the configuration xml files:
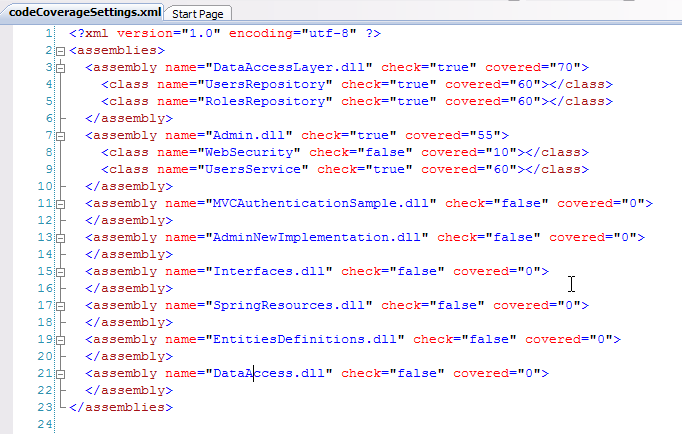
1. codeCoverageSettings.xml
In this file we must point all the assemblies from the solution (except unit tests assemblies, they should be put in CommittedFilesPolicy.xml) and their classes.
<?xml version="1.0" encoding="utf-8" ?>
<assemblies>
<assembly name="Admin.dll" check="true" covered="55">
<class name="WebSecurity" check="false" covered="10"></class>
<class name="UsersService" check="true" covered="60"></class>
</assembly>
<assembly name="MVCAuthenticationSample.dll" check="false" covered="0">
</assembly>
</assemblies>
The structure of the file is pretty straightforward and explanatory.
We list all the assemblies and for those we require certain threshold, we put the value in attribute “covered”. If we don’t want an assembly to be checked we set attribute “check” to false. This attribute value is taking over and if it is marked as false, no code coverage is run. In addition we may look for more granular requirements and ask for specific code coverage for every csharp class from certain assembly. Let’s say – we have an assembly with complex business logic in some of its classes. It is quite reasonable to desire above 80% code coverage for my most critical (from business perspective) parts of the project. For classes that are not so “important’ (I know important is irrelative when it comes to the quality), we may either set “check” attribute to false, or to diminish desired code coverage value.
Important:
For every new file in your project, you should go and alter the content of this codeCoverageSettings.xml by adding the class under appropriate xml “assembly” element. This is valid if the target assembly is going to be checked for code coverage! If not, you don’t have to list classes of the assembly. And the same pertains to every new project in the solution – you should go and manually alter the content by adding “assembly” element. Once again, assembly which is not going to be covered may not contain class elements.
I know this is a pain in the butt, but...let’s say this is the price we pay for torturing the developers (I am kidding).
If you try to commit files and you don’t have their assembly listed in the xml file, your commit operation will end up with error message which will bring to cancelling the entire commit operation.

2. svnUsers.xml
All svn users accounts which are going to be used in the project must be listed in this xml file. The “obeyPrecommitRules” attribute dictates if the svn user should be checked for code coverage on committing his files. If this attribute is set to false, no code coverage is performed during commit operation.
<?xml version="1.0" encoding="utf-8" ?>
<users>
<user obeyPreCommitRules="true">kbochevski</user>
</users>
Don’t forget to keep this file up-to-date too and list all svn accounts that are used in the project. Otherwise you will get exception and the commit will be cancelled.
3. CommittedFilesPolicy.xml
On committing the files, the hook checks if the log message is empty and if so, the commit is cancelled. Beside this, some content policy is in place. These settings are made in this configuration file.
<?xml version="1.0" encoding="utf-8" ?>
<ForbiddenToCommit>
<Folders>
<Folder>obj</Folder>
<Folder>bin</Folder>
</Folders>
<Files>
<File>suo</File>
<File>user</File>
<File>UnitTestsViaMSTest.dll</File>
</Files>
</ForbiddenToCommit>
As you see files with extensions “*.suo” and “*.*user” won’t be accepted. The same pertains to the “bin” and “obj” folder. Well, there is only one exception in the files elements here - UnitTestsViaMSTest.dll. This is the assembly with the unit tests and it should not be checked for code coverage too. So, I just use the CommitedFilesPolicy.xml for checking this. Technically this is the only element that you need to change from this file – adding in files elements your test assemblies (don’t forget to put .dll extension). NB: In our solution sample, there is one more test assembly-UnitTestsMVC. So, if you’d like to test the hook with my code, don’t forget to list it in file element like “UnitTestsViaMSTest.dll”. You can see the screenshots of the bottom of this article for reference.
All folders and non cshapr code files are ignored on committing. The same pertains to “add” and “delete” operations.
4. emails.xml
In this file we just put the email accounts of the users who we want to keep notified about others failures. When the hook fails due to failed unit tests or code coverage threshold violation, all recipient elements are fetched and the users are notified with email. In all other cases (some exception or other reasons) no email notifications are sent.
<?xml version="1.0" encoding="utf-8" ?>
<recipients>
<recipient>kbochevski@sbnd.net</recipient>
</recipients>
In order to get this working, you should also modify the app.config by setting your smtp server and account for it.
<system.net>
<mailSettings>
<smtp from="kbochevski@sbnd.net">
<network host="******" port="**" />
</smtp>
</mailSettings>
</system.net>
So far, so good. Let’s review what we need more to get this job done.
We somehow need to link the file which is going to be committed to its assembly in order to parse code coverage results correctly. Another obstacle is the fact the many svn users may commit in the same time and this may cause overriding of the code coverage result files.
Here are the solutions I decided to implement:
1. deciding which is the assembly for committed file
Since code coverage results give the covered blocks for each file in the assembly and it calculates the overall code coverage for the assembly itself we need a way to link the committed file to the assembly to which it belongs.
Since project files (*.csproj) gives information about their content, we can parse every project file in our solution and fetch the assembly name which contains the committed file.
For this purpose we need all *.csproj files on our repo server. That is why I developed small console application which maps a shared folder on the server as drive X: (the label’s name is hardcoded) and copies the project files in it.
Important: Please review next section carefully because it will require your settings in case you are using this pre-commit hook:
This is a configuration part from the console application called UnitTestsDistributor. This application is going to be used on the client side (on your own file system).
<appSettings>
<add key="svnUserName" value="kbochevski"/>
<add key="SVNProjectRootFolder" value="\\your-svn-server-name\ProjectsUnitTests\MVCDemo"/>
<add key="MSUnitTestsFolderPath" value="MSUnitTestsAssemblies"/>
<add key="ProjectsFiles" value="CSharpProjects"/>
</appSettings>
• SVNProjectRootFolder is the folder which is going to be mapped as a drive. The value contains path to the shared folder on the repo sever which must exist.
• MSUnitTestsFolderPath is the folder which will contain the assemblies which should be instrumented and examined with the unit tests assembly. It must exist.
• ProjectFiles is the folder which will contain all *.csproj files in order to fetch the project file for a committed file. It must exist.
• svnUserName – this is quite important. You must put your own svn account name when setting this up. Within project files and ms unit test folder, a dedicated folder with your username is going to be created at runtime. This preserves multi-user conflicts and overriding of code coverage results.
All of these folders above must exist on the repo server in order to get the hook properly working.
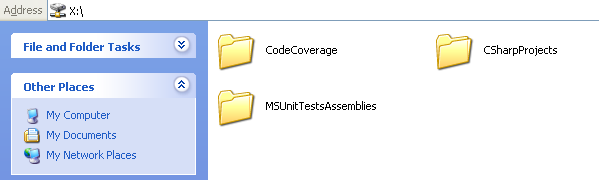
In addition, a folder with name “CodeCoverage” must be created within the particular project folder on the repo sever (in our case – MVCDemo\CodeCoverage). All code coverage results will be persisted within a special folder named with your svn account.
The screenshot below shows the folders that must exist on the repo server.
If we review the same section from hook’s application we will see that there are elements with the same keys and similar values. Well, with the difference that they point to the physical path of the shared folder on the repo server. That is because the commit process is run on the server and the path to the folders must be valid one. Also, make sure that the paths from appSettings in both app.config files point to the same location and keep the synchronized during your development! This is crucial.
<appSettings>
<add key="MSUnitTestsFolderPath" value="D:\ProjectsUnitTests\MVCDemo\MSUnitTestsAssemblies" />
<add key="CodeCoverageFolderPath" value="D:\ProjectsUnitTests\MVCDemo\CodeCoverage" />
<add key="ProjectsFiles" value="D:\ProjectsUnitTests\MVCDemo\CSharpProjects"/>
</appSettings>
As you can see from the screenshot, our local X: drive is mapped to D:\ProjectsUnitTests\MVCDemo from our repo server.

In order to copy all assemblies for the unit-test and the *.csproj files, we need to invoke our console application UnitTestsDistributor (I call it net mapper) and to pass it the path to the assemblies or to the project file. It is quite easy to achive all this with post-build events of your projects.
Important: That is another initial setup that you must perform in order to get all properly working.
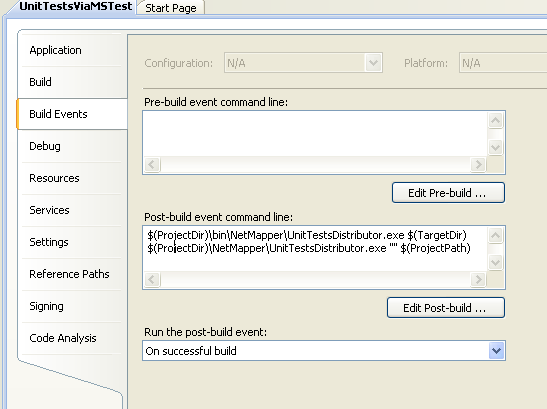
For copying the assemblies which we will need to run the unit tests, go to the your unit tests project, choose its properties and put this for post-build event:
$(ProjectDir)\bin\NetMapper\UnitTestsDistributor.exe $(TargetDir)
$(ProjectDir)\NetMapper\UnitTestsDistributor.exe "" $(ProjectPath)
Then go to the physical folder path of your project (on your machine file system) and within its bin folder create folder named “NetMapper”. After that, paste the bin\Debug or bin\Release (it depends how you built the console application) content of the UnitTestsDistributor project to the newly created “NetMapper” folder. Then you should copy the “NetMapper” folder and paste in the folder where the *.csproj file resides. It doesn't matter that your unit tests projects won’t be checked for code coverage, you still need their projects files on the repo server.
The screenshot below displays the post-build event of our unit-tests project.
As it comes to the project files, you need to perform similar steps. Go to the properties of every project in your solution (except this one with the unit tests) and put for post build next:
$(ProjectDir)\NetMapper\UnitTestsDistributor.exe "" $(ProjectPath)
As you see we use the very same console application, but we call it with difference parameters.
Another difference is that the “NetMapper” folder is not placed inside the bin folder. The reason for this is that in my project I use dependency injection and redirect projects’ output, so most of our projects don’t have bin folder. Go and create “NetMapper” folder in your project’s folder and paste the bin\Debug or bin\Release (it depends how you built it) content of the UnitTestsDistributor project to the newly created “NetMapper” folder.
Next image displays the “NetMapper” content and it is placed in the unit tests projects' bin folder:

NB: NetMapper should not be added to your repository.
NB: Once you build your projects, the appropriate content (*.csproj or bin folder of the unit test projects will be copied to the mapped drive and all the files we need will be on our svn repo server). Bear in mind that these settings (with the post build events) will be performed just once and afterward they will be a part of the project files which will be committed in the svn repository. So, if you are new to the project and checkout it, you will only need to create “NetMapper” folders without need of touching the post-build events. If you don’t have the “NetMapper” folders your solution will not build successfully.
Just for the record, before copying our test assemblies the content of folder is deleted.
The screenshot below displays the result that should be achieved after building our unit tests project. Its “bin” content is copied to the MSUnitTestsAssemblies shared folder on the repo server within a folder named with your svn account (“kbochevski” in our case).

2. avoiding multi-user conflicts
As I mentioned to avoid multi-user conflicts, we create a folder named with particular svn account that is used when committing files.
That is why, it is very important to change the value of
<add key="svnUserName" value="kbochevski"/> in your configuration file of the UnitTestsDistributor project.
I did one small optimization – once an assembly is found for particular *.cs file on committing, their relation is saved (thread safe) in a xml file, so rather than checking all *.csproj files on every commit, first the xml file called SolutionAssemblies.xml is checked. You should keep the SolutionAssemblies.xml empty as it is. The hook knows how to populate it correctly.
Considerations:
In order to get your unit tests successfully running and executing on the repo server, bear in mind that you should have installed everything that unit tests use to run our developers’ machines.
In our case we need to have installed MVC.NET, because some of the unit tests use *.dll files that MVC.NET contributes with its installation. Remember – if one of the unit tests fails, your commit is going to be rolled back.
The last configuration that must be done is to setup the calling of the pre-commit hook.
To do this:
i. in the hooks folder of your project on the SVN repo server create folder CodeCoverageHook and copy the content of our hooks’ application (PreCommitHook) bin\Debug|Release folder
ii. Create pre-commit.cmd and call the executable of our hook
D:\SVN_Repository\TestSVNHook\hooks\CodeCoverageHook\PreCommitHook.exe %1 %2
Now you are ready to start using the hook.
Just for the record. We are using next performance tools:
vsperfcmd.exe, vsperfmon.exe, vsinstr.exe and mstest.exe
This means that you must have the performance tools of Visual Studio installed on the repo server.
Since all the assemblies that are used for the unit testing are copied only on building the test project(s), there is a way to avoid the code coverage checking with the latest version of the tests assemblies. That means that we can run unit-test which are not up-to-date, because the unit test project(s) might not be rebuilt. Well, I can assure you it is a matter of time your team leader to update the project and to run the tests or your continuous build to fail at the end of the day. That is why I didn’t go far and force rebuilding\copying assemblies of test project on every build in the solution.
NB: If you stuck with some exceptions when start using the hook don’t waste your time to try debugging it. Use the logged information from the log files to diagnose the problem and add more output to the log file with log4net if needed.
Also, I consider that in case of mass commit the right way to use the hook is to commit the files that belongs to assemblies which should not be checked for code coverage and after that to commit the files that will be checked according the content of codeCoverageSettings.xml. It is all because the running of unit tests and examining the results takes time, and you don’t want the commit of 30 files to fail, because of the policy violation, do you?
.NET solution details:

As you see the solution contains 2 projects – PreCommitHook and UnitTestsDistributor.
The first one is our hook application which runs on every commit and the latter is responsible for copying *.csproj files and the assemblies for unit tests on the repo sever in dedicated folders.
“MSTestCodeCoverage” folder contains the code related to running the tests via mstest.exe and examining the result. The methods of these classes are invoked in PreCommitValidator.cs. If you are only interested in running ms unit tests and examining their results, go and review these 3 files.
SVNHelpers classes are related to the getting data about committed files in the svn repository.
The Config folder contains all the xml files that we already reviewed above.
Both projects use log4net, so you can find the log files of the operations in the appropriate LogFiles\log-file.txt
Important: Copy the dbghelp.dll from ExternalAssemblies folder (part of the provided source code of this article) to your hook’s bin folder.
Finally, we are going to run again through the configuration steeps needed for setting up the hook and its helper application – the “mapper”. Some of the steps should be executed only by users who have access to the repo server.
1) Create needed folders: Go to the shared folder of the SVN repo server and create the folders: CodeCoverage, MSUnitTestsAssemblies, CSharpProjects. They all must be placed in a folder of your particular project (MVCDemo in our case). After you set the post-build events and place “NetMapper” folders in your solution physical folders, you should have mapped D:\ProjectsUnitTests\MVCDemo as X: drive. Don’t forget that this is configurable throught the app.config of “net mapper” console application. (step 3 below)

2) Configure needed files: your team leader (usually) must set the initial values of the conf files and to keep them up to date during the development process. The configuration files are: svnUsers.xml, codeCoverageSettings.xml, CommittedFilesPolicy.xml, emails.xml
Since I am reviewing the usage of the pre-commit hook with the source code of one of my articles Unit testing MVC.Net, below are the screen shots of the codeCoverageSettings.xml and CommittedFilesPolicy.xml filled according the needs of this project.

3) Network “mapper” folders – every developer should create the NetMapper folders on his file system and to put them inside the appropriate folder according the post-build events of the projects. If you are the first one who creates the settings, you should set also the post-build events as described earlier. Set up the app.config of the mapper application and put your svn account name. Configuration files of both applications in the solution should be synched up.
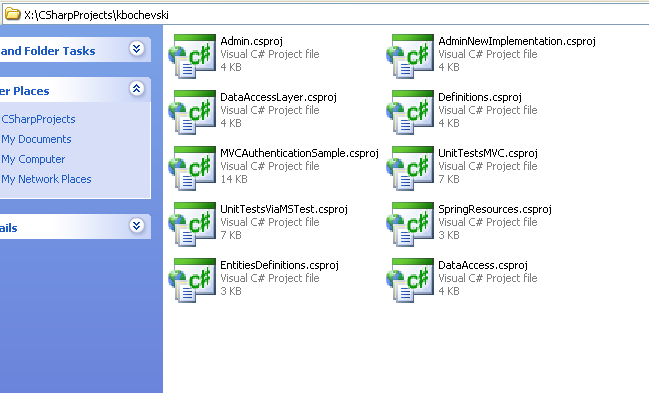
The screenshot below displays the content of the shared “CSharpProjects” folder. Every project file is copied to a folder named with your svn account after setting the post-build events (if not set already) and building the projects.
4) Go to the app.config file of the hook and set up your smtp server data and paths to the folders (those one from step 1. ). This should be done by user who has access to the repo server, since the hook is run on the repo server.
5) Go to the repo server and setup the hook’s invocation. Your hook’s folder should have similar content, once you are done with this step. NB: You should manually put dbghelp.dll to the bin folder of the hook!

The screenshot below shows how to call the hook on your repo server.

I advise everyone who decides to use the source code, to review it and optimize it according his needs. There is lots of room for improvements and also there are things that someone wouldn’t want to explore. Anyway I hope you will find something helpful.
The source code related to this article can be downloaded from here.

Hi,
ReplyDeleteI found your post is very informative. The article is professionally written and I feel like the author knows the subject very well.Keep it that way.will we talk in this weekend through the email?? Pls Let me know that. Promise that i 'll not take too much time from you.
Nick
E:- hire.netprogrammer.com@gmail.com
hey gracias por el articulo...por fa coloca mas de estos
ReplyDelete