Jan 23, 2011

Setup FBA for SharePoint 2010 using VS installer

When we want our SharePoint applications to support form based authentication, after all setups we will end up with the provisioning of web config settings in order to link our membership database with SharePoint (regardless of the type of the membership provider). There are plenty of topics over the internet dedicated to this, and in generally there are two ways to achieve this.

1. create a supplemental config file
2. do it programmatically by using SPWebConfigModification class

After the setup of the web application as claim-based we need to modify next web config files in order to get this working:
1. Adjust the web.config of the Central Administration site
2. Adjust the web.config of STS (Security Token Service)
3. Adjust the web.config of our claim-based web application

This article describes how to provision all clam-based related settings with Visual Studio Installer and includes next major steps:
• creating membership database
• creating supplemental web config file based on created membership database
• modifying web.config of STS
• modifying web.config of Central Admin
• running PowerShell scripts during the installation process

For my article I adopted the approach with supplemental config file.
How does supplemental web config work?

Once you have your supplemental web.config file (called for example webconfig.FBAHelper.xml) in 14\CONFIG folder, after creating new web application its content will be merged with the web config files of every newly created application. So, we pretty much need only to modify the web.config of STS and Central Admin applications to get the form-based authentication working.

It is important to set the right names of the membership provider and the role manager, when setting up the claim based authentication in SharePoint. They must correspond to those from generated supplemental config file.


In the source code of the installer you will see that their names are hard-coded, but you can improve it and refine it in way which fully fits your needs.

The process of setting up FBA can be described with next major steps:
1. Run the Visual Studio Installer, which creates for you the membership database, generates supplemental config file and places it in 14\Config folder, modifies the web.config of STS
2. Create and setup FBA web application and put the right names for membership provider name and role manager. At this point the supplemental configuration file from step 1) will be merged with the web.config file of the newly created application.

Let’s get started with this and review the process in details step by step.


• First we will need a windows form in our VS Installer, in which the user can setup the credentials and name of the membership database that will be created:


There is nothing special about this dialog. During the installation process it passes the arguments needed for running aspnet_regsql.exe to the installer class. It doesn’t check if the sql user (in case you choose SQL Server authentication) has the appropriate roles for successfully running aspnet_regsql.exe. If you go for SQL Server authentication, the user must have the “dbcreator” role and if the aspnet_regsql is run against existing databse, the user must be assigned to it too. Connection string for the membership database will be created based on the input from this screen. This connection string will be placed in the supplemental web.config file along with membership provider and the role manager stuff.

• In the installer class we are gettting the input from the custom screen and starting aspnet_regsql.exe using PowerShell. There is a folder in the “CustomForms” project called PowerShellScripts. Currently there is one script only within it, which pretty much does nothing (honestly, I had different intentions about it when I started to develop this code sample, but I left them behind). But it is a good example for how to use PowerShell in the MS installers. This file is placed on the FileSystem of the installer and will be placed on the machine on which you run the installer. So, you will have the location of the script and can run it during installation process.


If you have experience with running PowerShell scripts you know that sometimes you need the short path to your script, otherwise its execution fails.
That is what public static extern int GetShortPathName servers for. It gives you the short path of script’s location.

• After membership database is successfully created, the connection string is generated (based on the input from the dialog form) and it is placed in the supplemental config. I make one very...clumsy check on executing aspnet_regsql.exe. I read the output of the process and if it ends with “Finished.”, i assume that the database is successfully created. Otherwise the installation is rolled back.

Well, at the next step generation of the supplemental config file and modification of the STS and Central Admin applications’ config come in place. SupplementalWebConfigManager class in the “CustomForms” project has 3 static methods: CreateSupplementalConfig, ModifySTSWebConfig and ModifyCentralAdminConfig. Linq to XML is used in all of them for generating and modifying xml. Pretty much they get as parameter path to the file which they must generate/modify and the generated connection string. That is all.
NB: The paths to the config files of Central Admin and STS are hard-coded in the installer, so you can either change it if you use the installer or add it as input to the custom form. It might be a good decision for example to fetch the central admin through the PowerShell script using something like this:
$adminwebapp = Get-spwebapplication -includecentraladministration | where {$_.IsAdministrationWebApplication}

You can even modify its config file with the PowerShell script. Anyway, for the Central Admin you must change the path and to make it valid according your SP server.

Here it is how our supplemental config should look in our case:


Let’s give it a try using both Windows authentication and SQL Server authentication and see how it works step by step.

1) SQL Server Authentication
Create new user of type SQL Server Authentication. Give him name “fba” and password “fba”. Assign him “dbcreator” server role.

We can start our installer on the SharePoint server.


After the installation process finishes, we can go check that next things have happened:

• we have the product (in our case called MembershipInstaller) installed


• Membership database is created


• The supplemental config file is generated and placed within the CONFIG folder


• The web.config of our newly created application is merged with our supplemental config file
We can go to C:\inetpub\wwwroot\wss\VirtualDirectories\36816 and open the web.config (36816 is the port of our new web application). All settings from the supplemental config should be there.

The connection string is also added to the very same web.config file.

• STS web.config is modified


• Central Admin web.cofing is modified


If all of the points above are valid, we can go ahead, create new web application in central admin, add a user in our membership database and see if we can log in with him in the SharePoint web application.

We can create new web application in Central Admin. As I mentioned earlier, we should put the same values for ASP.NET Membership provider name and ASP.NET Role manager name as those from generated configs.


After successful creation of the application and its site collection, we can check that the login page appears when try accessing our web application.


Let’s add one user in the membership database.


Now, we can add this user in the Visitor’s group in SharePoint.


At last we can login using our membership account.


2) Windows Authentication

The only difference with “SQL Server authentication” option in our installer will be the generated connection string.


The rest of the steps that should be taken are the same as the listed above.

This installer can be improved and you can have let’s say additional steps for setting up the policy for the membership provider. Or you can run whatever you want in the PowerShell script. You can also modify the code which generates the supplemental config file in order to serve your needs.
May be you can add uninstall action and remove the supplemental config on it. Otherwise every newly created web application will merge its web.config with the content of the supplemental config.

I hope this article was helpful. You can download the related source code here. Any feedback is appreciated.


Read full article!

Jan 16, 2011

Accessing Membership database inside SharePoint 2010 SPList event handler

If we have Claims-based authentication and Membership database hooked in the SharePoint, a very common scenario could be adding new user to the membership database within SPList event handler (let’s say in ItemAdding). We would like to check there if the user already exists there, if so to redirect to our custom error page, of not – just add it to the membership database.

Well, if you just try to access the membership database and fetch all the users you will end up with “NullReferenceException”.


Well, if you dig around about problems like this, you can see some helpful posts stating that HtppContext is null in the Event handlers for SharePoint list.
Could that be the reason? And that is weird, because we instantly would ask ourselves – what has SqlMembershipProvider in common with the HttpContext? And the natural answer of course is – nothing (well, GetCurrentUserName() relies, but if we take a look in its body, it should definitely not bring to null reference exception).

But, if we really take a look at the stack trace of the exception we will see that what is called is not the method of SqlMembershipProvider, but the method of SPClaimsAuthMembershipProvider.
If we open the reflector and see what’s happening in its methods, we will get answered right away!
StackTrace:
at Microsoft.SharePoint.Administration.Claims.SPClaimsAuthProviderUtility.GetPassthroughMembershipProvider()
at Microsoft.SharePoint.Administration.Claims.SPClaimsAuthMembershipProvider.GetAllUsers(Int32 pageIndex, Int32 pageSize, Int32& totalRecords)
at System.Web.Security.Membership.GetAllUsers()
at MySolution.Code.EventHandlers.RegisterUsersEventHandlers.<>c__DisplayClass1.b__0()
at Microsoft.SharePoint.SPSecurity.<>c__DisplayClass4.b__2()
at Microsoft.SharePoint.Utilities.SecurityContext.RunAsProcess(CodeToRunElevated secureCode)


If we use the reflector and check the body of called methods we will see next:


And the reason for calling SPClaimsAuthMembershipProvider is the fact that it is the default provider used according the web.config of our application.


Knowing what the reason is, makes fixing the problem achievable in 2 different ways. Let’s quickly review the solutions:

Solutions:
1)Continue to rely on SPClaimsAuthMembershipProvider and obtaining HttpContext.Current

Just instantiate the HttContext.Current If it is null:

if (HttpContext.Current == null)
{
HttpRequest request = new HttpRequest(String.Empty, sp_web.Url, String.Empty);
HttpContext.Current = new HttpContext(request, new HttpResponse(new StringWriter()));
}


If you instantiated new HttpContext, it would be good to reset it at the end of your methods back to null. Just make sure this happens only if HttpContext.Current was null at the beginning.

2)Working with the SqlMembershipProvider and forgetting about HttpContext.Current issue

What we need is to get the SqlMembershipProvider from registered providers and to start using it.
SqlMembershipProvider sqlMembershipProvider = (SqlMembershipProvider)Membership.Providers["FBAMembershipProvider"];

Bear in mind that you should put the name as it is in your web.config file.

Read full article!

Nov 26, 2010

SharePoint 2010 Custom Web Part with jqGrid

The development of custom web parts in SharePoint often brings some questions like – how will I do sorting and searching. How will I support and implement paging, can I have modal pop up with details information presented?
Well, if you need to develop all these features from scratch, you will end up with tons of javascript files and code behind methods for building the complex interface. Most likely you will also have css file with a quite big content. And since the web part is pretty much custom control, debugging what it renders is pain in the butt.
I had the same concerns and decided to implement my web part using jqGrid, which pretty much gives out-of-the-box the sorting, paging and filtering. Plus it is easy configurable in few lines javascript.
Here I am going to explain the steps and twists I did in my implementation.

The solution is not specific to SP2010, so you can implement it easily in SP 2007 too. It demonstrates the usage of jqGrid, with pop ups and hyperlinks in the cells. The content of the pop up is created dynamically on the server side depending on the clicked row.

I am using WSPBuilder for project template and the PoC scenario is: Based on Customers SPList we want to create a web part which presents its data, and adds a modal dialog representing orders history for every customer from the list. We’d like our web part to support – sorting, paging, and filtering, and to have decent look-and-feel.


After creating the structure of the project, the solution should pretty much looks like on the screen shot below:


Following the samples of jqGrid we need to build similar output (as html) in order to get this working.
Check the demo of jqGrid for details at http://www.trirand.com/blog/jqgrid/jqgrid.html.

HTML
...
<table id="list2"></table>
<div id="pager2"></div>

This can be easily achieved in the CreatedChildControls method. By using HtmlTable, HtmlTableRow, HtmlTableCell, HtmlGenericControl the needed output can be generated at server side.

There is a little twist as it comes to the pop ups. The pop ups should be user controls placed in the ControlTemplates folder. Ideally, they should keep some presentation and persistence logic in their code behind. In order to get them smoothly displayed in consistent to jqGrid manner, we need to use jquery dialog function. Also, in order to display data related to particular SPListItem, we need to pass the SPListItem.ID as a parameter of the function which takes care of the visualization.
For rendering the jqGrid next js functions and styles are used:
• jquery-1.4.2.min.js
• jquery-ui-1.8.5.custom.min.js
• /jqGrid/js/i18n/grid.locale-en.js
• /jqGrid/js/jquery.jqGrid.min.js
• SampleWebPart.js
• OrdersHistoryDetail.js

• jquery-ui-1.8.5.custom.css
• jqGrid/css/ui.jqgrid.css

We can inject all of our javascript functions and styles using RegisterStartupScript of ClientScriptManager.

clientScript.RegisterStartupScript(typeof(Page), "jQueryJQWebPart_UI", JQueryGUILibrary);

public string JQueryGUILibrary
{
get
{
return @"<script src='" + _jqueryMainFilePath + "' type='text/javascript'></script>" +
@"<script src='" + _jqueryUIFilePath + "' type='text/javascript'></script>" +
@"<script src='" + _jqueryGridLocalePath + "' type='text/javascript'></script>" +
@"<script src='" + _jqueryGridPath + "' type='text/javascript'></script>" +
@"<script src='" + _jqGridWebPartFilePath + "' type='text/javascript'></script>" +
@"<script src='" + _jqGridWebPartOrdersHistoryFilePath + "' type='text/javascript'></script>" +
@"<link href='" + _jqueryUICss + @"' rel=""stylesheet"" type=""text/css"" />" +
@"<link href='" + _qGridCss + @"' rel=""stylesheet"" type=""text/css"" />";

}
}
Since our pop ups are ASCX controls, we need to load them and add them to the rendered content “hidden”. Once the user calls the pop up visualization, we can display them and load their content from SP content database.
Now it comes the tricky part. We need not only a way to display the ascx control by passing its id to the dialog() function. We need also to secure a mechanism for displaying its content dynamically on the server side, depending on which row from the grid is chosen.

Bear in mind that control’s client id is generated on the server side by the time control is added to the web part output. And on the client side it will be something like: ctl100_....We’d like to avoid this, so in this sample I inject the generated client ids in the rendered content.

Next code injects the function that visualizes the user control in the host aspx of the web part.
public string PopUpJsFunctions
{
get
{

return @"<script type=""text/javascript"">
//<![CDATA[
function displayUserControl(contentDivId, selectedListItemID)
{
CallServer(selectedListItemID);
$('#' + contentDivId).dialog();

}
//]]>
</script>";
}
}
Now, the question is how to get the specific content of the user control and to display it in the user control dialog prior to its visualization. Here comes in help the ICallbackEventHandler, which implementation provides asynchronous post backs to the server by sending only user defined information, rather the all data passed on “full” post back. In our case we will pass the SPListItem.ID, which we keep in the grid’s store, and will return the specific content of the details pop up. This content fully depends on the SPListItem in the correspondent SPList and will be generated on the server side. It looks exactly like what we are looking for. So, let’s make our web part implements the ICallbackEventHandler interface.

public class SampleJQueryWebPart : WebPart, ICallbackEventHandler

public string GetCallbackResult()
{
return DynamicOrdersHistoryForm(selectedListItemID);
}

public void RaiseCallbackEvent(string eventArgument)
{
selectedListItemID = Convert.ToInt32(eventArgument);
}

The dynamically generated html is very simple, and it only aims to demonstrate the PoC.

On the OnLoad in our custom web part we can inject the client side functions with its callback.

//dynamic callback on clicking (...) in Orders history column for each row in the jquery grid
String cbReference = clientScript.GetCallbackEventReference(this, "arg", "ReceiveServerData", "");
String callbackScript = "function CallServer(arg, context) {" + cbReference + "; }";
clientScript.RegisterClientScriptBlock(this.GetType(), "CallServer", callbackScript, true);

That is!

Another tricky moment is the way we feed the jqGrid with json formatted result. Since it is ASPX web forms alike, the most convenient and reasonable way to do so is by using generic handlers.
In order to make the generic handler working in our case we need to do next:
Create a new ashx file in your Layouts folder (in our case in specific folder within Layouts)
Remove its cs file and place it in the Code folder of the solution.
Go to the markup and do next change:

<%@ WebHandler Language="C#" CodeBehind="GetSampleGridContent.ashx.cs" Class="CustomWebPart.SharePointRoot.TEMPLATE.LAYOUTS.JQWebPart.GetSampleGridContent" %>
Becomes:
<%@ WebHandler Language="C#" Class="CustomWebPart.Code.GenericHandlers.GetSampleGridContent, CustomWebPart, Version=1.0.0.0, Culture=neutral, PublicKeyToken=59c2732ac8e0deaf"" %>

In order go get paging working properly we need a wrapper object which will present the data in expected by the jqGrid format:
public class CustomersData
{
public int Total { get; set; }
public int Page { get; set; }
public int Records { get; set; }
public List Rows { get; set; }
}

CustomerEntity class should have the very same properties as those enumerated in colModel of the grid.
I won’t go into details of the implementation. You can download the code of this article and review it.

I have one more class called CustomersGUItHelper, which provides search, filter functionality and instantiates the CustomersData object which is serialized in json format and returned to the GUI by our generic handler.
MemoryStream stream = new MemoryStream();

DataContractJsonSerializer ser = new DataContractJsonSerializer(typeof(CustomersData));

ser.WriteObject(stream, jsonData);
stream.Position = 0;

StreamReader sr = new StreamReader(stream);

var json = sr.ReadToEnd();

context.Response.Write(json);
context.Response.End();

On the client side we have major 2 javascripts only:
• SampleWebPart.js
This file is contains the definition of the jqGrid.
• OrdersHistoryDetail.js
For the PoC I have created this files contains only the callback function on the client site. Ideally it should contain also the validation functions, and the save functions (if we assume they are implemented with ajax post).
function ReceiveServerData(result, context) {
var divContent = $("#" + varDetailsControlContainerId);
divContent.html(result);

}
Here are the steps for installing and uninstalling our solution:
Install steps:
1)Add-SPSolution

C:\Users\kbochevski\Desktop\jqGridSPWebPart\CustomWebPart\CustomWebPart\CustomWebPart.wsp

2)

Install-SPSolution -Identity 6195c1de-8e41-4537-a66d-e93b10d22f25 -GACDeployment -Local -WebApplication SPKaloyan -Force

3) Go to http://your_web_app/_layouts/newdwp.aspx, find the web part, mark it and click “Populate the gallery”
4) Create sample page and add the web part in it.

http://your_web_app/SitePages/jqGridSampleWebPart.aspx

Uninstall steps:
1)
Uninstall-SPSolution -Identity 6195c1de-8e41-4537-a66d-e93b10d22f25 -Local -WebApplication SPKaloyan

2)
Remove-SPSolution
6195c1de-8e41-4537-a66d-e93b10d22f25

After deploying the solution and creating a sample page which hosts the custom web part, it should look lie this:


We can review the orders history for every customer in the web part by clicking the (…) hyperlink in the “Orders History” column.


We can filter (search) the customers by Name. This is configurable in SampleWebPart.js. I have implemented this functionality for one column only.


Our custom web part gets its data from the custom list called Customers.


The same concept may be applied to another ajax frameworks like extjs for example. You can now create custom web parts based on ajax controls, which gives you decent look-and-feel and powerful client side functionality.

You can download the code related to this article here.

Read full article!

Oct 26, 2010

SVN Pre-Commit hook in C# for checking code coverage thresholds of code files

The content of this article is not designed for people who consider that unit testing is over-engineering.

Have you ever thought of the possibilities to force (literally) all developers in your team to produce quality code? And what can be an objective measurement for quality? I am sure all of us have own opinion on this subject. Well, to me a good code is code which works flawless (as good as it gets, at last we are all human beings and making mistakes is just natural), code which is easily extensible and scalable, and code which is developed in the estimated terms (LOL I sound like PM).

Many of us have tried different approaches to accomplish that challenging goal. There are plenty of technologies that imply to separation of concerns. And despite this, a good high-level architecture doesn’t lead to good low-level architecture design by default, hence to the development of quality code. I can say it this way – no matter what one can chooses and designs, there is always pretty good chance someone to screw up your ideas. But, think about how hard (close to the impossible) would be to cover crappy code with unit tests…

That was mine motivation for scripting this article. I made up the weird idea to develop pre-commit hook which forbids committing of csharp code files if they don’t follow some code coverage policy. From one side this is performance overkill. Every time that someone commits code to the svn repository, an execution and parsing the results of all unit tests is performed (if the assembly is configured to be checked for code coverage). In case of mass commit, the unit tests are run once only and their results are reused for every file from the pool of pending files to commit. From other side – this is a fairly good chance to stop and fix the things at the beginning, before it becomes a way too late and messy.
I know that there are “things” called continuous integration tools which might be decent solution too. But this a step further than the subject of the current discussion. Let’s say that I love being extreme…Anyway, in this article I am going to review how we can check certain classes and assemblies for desired code during the commit operation. So, you can take this more like idea and to figure out whether this works for you or not. I am not putting this in your face saying – that is the way things should happen. In this article you can at least find how to examine code coverage results built with MSTest. So at last you may find something helpful here.


Straight to the subject.

SVN pre-commit hook is run when the transaction is complete, but before it is committed. Typically, this hook is used to protect against commits that are disallowed due to content or location (or in our case – committing policy inconsistence). The repository passes two arguments to this program: the path to the repository, and the name of the transaction being committed. If the program returns a non-zero exit value, the commit is aborted and the transaction is removed. You can then invoke this on pre-commit by adding a pre-commit.cmd file to the hooks folder of the repo with the following line:
[path]\PreCommit.exe %1 %2

Code coverage can be run and examined with every code-coverage tool. For the purposes of this article I use MSTest and its performance tools for building code coverage results.

On every commit, a code coverage policy is been checked and if there is a violation, the commit operation is aborted. It doesn’t matter if you are trying to commit one or one hundred files. If one fails, all fail. Fair enough…think twice what code you are about to commit.

Technically in order to fulfill our goal, we need to get the file which we are going to commit, to get the assembly to which it belongs, to run the code coverage, to get its results and to parse them checking if there are failed tests and if not, are the code coverage results the same as we want them to be. If the results don’t meet our expectation, we cancel the entire commit operation and send email to the appropriate person (it is configurable).

In order to keep all the preferences (policies) configurable (as much as possible), we read them from xml files, so once deployed, the hook can be easily tuned according the project for which it is used.
In the examples I use the source code of my article Unit testing MVC.Net. You can download the source code of this article it and try integrate it with the pre-commit hook of this article.

Let’s review the configuration xml files:
1. codeCoverageSettings.xml
In this file we must point all the assemblies from the solution (except unit tests assemblies, they should be put in CommittedFilesPolicy.xml) and their classes.

<?xml version="1.0" encoding="utf-8" ?>
<assemblies>
<assembly name="Admin.dll" check="true" covered="55">
<class name="WebSecurity" check="false" covered="10"></class>
<class name="UsersService" check="true" covered="60"></class>
</assembly>
<assembly name="MVCAuthenticationSample.dll" check="false" covered="0">
</assembly>
</assemblies>

The structure of the file is pretty straightforward and explanatory.
We list all the assemblies and for those we require certain threshold, we put the value in attribute “covered”. If we don’t want an assembly to be checked we set attribute “check” to false. This attribute value is taking over and if it is marked as false, no code coverage is run. In addition we may look for more granular requirements and ask for specific code coverage for every csharp class from certain assembly. Let’s say – we have an assembly with complex business logic in some of its classes. It is quite reasonable to desire above 80% code coverage for my most critical (from business perspective) parts of the project. For classes that are not so “important’ (I know important is irrelative when it comes to the quality), we may either set “check” attribute to false, or to diminish desired code coverage value.
Important:
For every new file in your project, you should go and alter the content of this codeCoverageSettings.xml by adding the class under appropriate xml “assembly” element. This is valid if the target assembly is going to be checked for code coverage! If not, you don’t have to list classes of the assembly. And the same pertains to every new project in the solution – you should go and manually alter the content by adding “assembly” element. Once again, assembly which is not going to be covered may not contain class elements.
I know this is a pain in the butt, but...let’s say this is the price we pay for torturing the developers (I am kidding).

If you try to commit files and you don’t have their assembly listed in the xml file, your commit operation will end up with error message which will bring to cancelling the entire commit operation.


2. svnUsers.xml
All svn users accounts which are going to be used in the project must be listed in this xml file. The “obeyPrecommitRules” attribute dictates if the svn user should be checked for code coverage on committing his files. If this attribute is set to false, no code coverage is performed during commit operation.

<?xml version="1.0" encoding="utf-8" ?>
<users>
<user obeyPreCommitRules="true">kbochevski</user>
</users>

Don’t forget to keep this file up-to-date too and list all svn accounts that are used in the project. Otherwise you will get exception and the commit will be cancelled.
3. CommittedFilesPolicy.xml
On committing the files, the hook checks if the log message is empty and if so, the commit is cancelled. Beside this, some content policy is in place. These settings are made in this configuration file.
<?xml version="1.0" encoding="utf-8" ?>
<ForbiddenToCommit>
<Folders>
<Folder>obj</Folder>
<Folder>bin</Folder>
</Folders>
<Files>
<File>suo</File>
<File>user</File>
<File>UnitTestsViaMSTest.dll</File>
</Files>
</ForbiddenToCommit>

As you see files with extensions “*.suo” and “*.*user” won’t be accepted. The same pertains to the “bin” and “obj” folder. Well, there is only one exception in the files elements here - UnitTestsViaMSTest.dll. This is the assembly with the unit tests and it should not be checked for code coverage too. So, I just use the CommitedFilesPolicy.xml for checking this. Technically this is the only element that you need to change from this file – adding in files elements your test assemblies (don’t forget to put .dll extension). NB: In our solution sample, there is one more test assembly-UnitTestsMVC. So, if you’d like to test the hook with my code, don’t forget to list it in file element like “UnitTestsViaMSTest.dll”. You can see the screenshots of the bottom of this article for reference.

All folders and non cshapr code files are ignored on committing. The same pertains to “add” and “delete” operations.
4. emails.xml
In this file we just put the email accounts of the users who we want to keep notified about others failures. When the hook fails due to failed unit tests or code coverage threshold violation, all recipient elements are fetched and the users are notified with email. In all other cases (some exception or other reasons) no email notifications are sent.

<?xml version="1.0" encoding="utf-8" ?>
<recipients>
<recipient>kbochevski@sbnd.net</recipient>
</recipients>

In order to get this working, you should also modify the app.config by setting your smtp server and account for it.

<system.net>
<mailSettings>
<smtp from="kbochevski@sbnd.net">
<network host="******" port="**" />
</smtp>
</mailSettings>
</system.net>

So far, so good. Let’s review what we need more to get this job done.
We somehow need to link the file which is going to be committed to its assembly in order to parse code coverage results correctly. Another obstacle is the fact the many svn users may commit in the same time and this may cause overriding of the code coverage result files.
Here are the solutions I decided to implement:
1. deciding which is the assembly for committed file
Since code coverage results give the covered blocks for each file in the assembly and it calculates the overall code coverage for the assembly itself we need a way to link the committed file to the assembly to which it belongs.
Since project files (*.csproj) gives information about their content, we can parse every project file in our solution and fetch the assembly name which contains the committed file.
For this purpose we need all *.csproj files on our repo server. That is why I developed small console application which maps a shared folder on the server as drive X: (the label’s name is hardcoded) and copies the project files in it.
Important: Please review next section carefully because it will require your settings in case you are using this pre-commit hook:

This is a configuration part from the console application called UnitTestsDistributor. This application is going to be used on the client side (on your own file system).
<appSettings>
<add key="svnUserName" value="kbochevski"/>
<add key="SVNProjectRootFolder" value="\\your-svn-server-name\ProjectsUnitTests\MVCDemo"/>
<add key="MSUnitTestsFolderPath" value="MSUnitTestsAssemblies"/>
<add key="ProjectsFiles" value="CSharpProjects"/>
</appSettings>
• SVNProjectRootFolder is the folder which is going to be mapped as a drive. The value contains path to the shared folder on the repo sever which must exist.
• MSUnitTestsFolderPath is the folder which will contain the assemblies which should be instrumented and examined with the unit tests assembly. It must exist.
• ProjectFiles is the folder which will contain all *.csproj files in order to fetch the project file for a committed file. It must exist.
• svnUserName – this is quite important. You must put your own svn account name when setting this up. Within project files and ms unit test folder, a dedicated folder with your username is going to be created at runtime. This preserves multi-user conflicts and overriding of code coverage results.

All of these folders above must exist on the repo server in order to get the hook properly working.
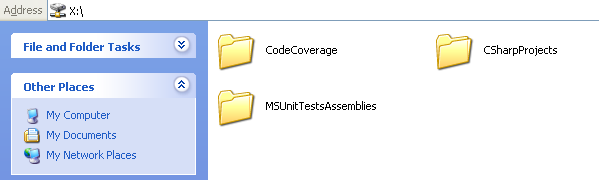
In addition, a folder with name “CodeCoverage” must be created within the particular project folder on the repo sever (in our case – MVCDemo\CodeCoverage). All code coverage results will be persisted within a special folder named with your svn account.
The screenshot below shows the folders that must exist on the repo server.


If we review the same section from hook’s application we will see that there are elements with the same keys and similar values. Well, with the difference that they point to the physical path of the shared folder on the repo server. That is because the commit process is run on the server and the path to the folders must be valid one. Also, make sure that the paths from appSettings in both app.config files point to the same location and keep the synchronized during your development! This is crucial.

<appSettings>
<add key="MSUnitTestsFolderPath" value="D:\ProjectsUnitTests\MVCDemo\MSUnitTestsAssemblies" />
<add key="CodeCoverageFolderPath" value="D:\ProjectsUnitTests\MVCDemo\CodeCoverage" />
<add key="ProjectsFiles" value="D:\ProjectsUnitTests\MVCDemo\CSharpProjects"/>
</appSettings>

As you can see from the screenshot, our local X: drive is mapped to D:\ProjectsUnitTests\MVCDemo from our repo server.

In order to copy all assemblies for the unit-test and the *.csproj files, we need to invoke our console application UnitTestsDistributor (I call it net mapper) and to pass it the path to the assemblies or to the project file. It is quite easy to achive all this with post-build events of your projects.
Important: That is another initial setup that you must perform in order to get all properly working.
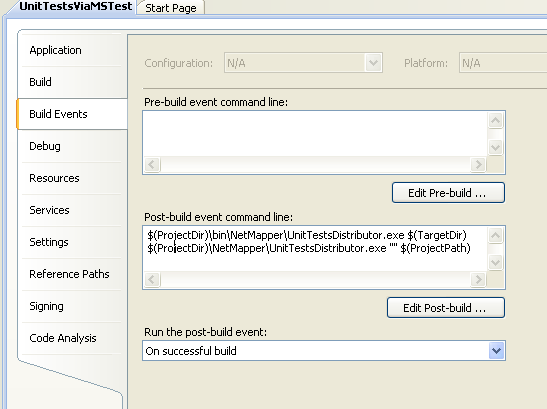
For copying the assemblies which we will need to run the unit tests, go to the your unit tests project, choose its properties and put this for post-build event:
$(ProjectDir)\bin\NetMapper\UnitTestsDistributor.exe $(TargetDir)
$(ProjectDir)\NetMapper\UnitTestsDistributor.exe "" $(ProjectPath)

Then go to the physical folder path of your project (on your machine file system) and within its bin folder create folder named “NetMapper”. After that, paste the bin\Debug or bin\Release (it depends how you built the console application) content of the UnitTestsDistributor project to the newly created “NetMapper” folder. Then you should copy the “NetMapper” folder and paste in the folder where the *.csproj file resides. It doesn't matter that your unit tests projects won’t be checked for code coverage, you still need their projects files on the repo server.
The screenshot below displays the post-build event of our unit-tests project.

As it comes to the project files, you need to perform similar steps. Go to the properties of every project in your solution (except this one with the unit tests) and put for post build next:
$(ProjectDir)\NetMapper\UnitTestsDistributor.exe "" $(ProjectPath)
As you see we use the very same console application, but we call it with difference parameters.
Another difference is that the “NetMapper” folder is not placed inside the bin folder. The reason for this is that in my project I use dependency injection and redirect projects’ output, so most of our projects don’t have bin folder. Go and create “NetMapper” folder in your project’s folder and paste the bin\Debug or bin\Release (it depends how you built it) content of the UnitTestsDistributor project to the newly created “NetMapper” folder.
Next image displays the “NetMapper” content and it is placed in the unit tests projects' bin folder:

NB: NetMapper should not be added to your repository.

NB: Once you build your projects, the appropriate content (*.csproj or bin folder of the unit test projects will be copied to the mapped drive and all the files we need will be on our svn repo server). Bear in mind that these settings (with the post build events) will be performed just once and afterward they will be a part of the project files which will be committed in the svn repository. So, if you are new to the project and checkout it, you will only need to create “NetMapper” folders without need of touching the post-build events. If you don’t have the “NetMapper” folders your solution will not build successfully.

Just for the record, before copying our test assemblies the content of folder is deleted.

The screenshot below displays the result that should be achieved after building our unit tests project. Its “bin” content is copied to the MSUnitTestsAssemblies shared folder on the repo server within a folder named with your svn account (“kbochevski” in our case).

2. avoiding multi-user conflicts
As I mentioned to avoid multi-user conflicts, we create a folder named with particular svn account that is used when committing files.
That is why, it is very important to change the value of
<add key="svnUserName" value="kbochevski"/> in your configuration file of the UnitTestsDistributor project.
I did one small optimization – once an assembly is found for particular *.cs file on committing, their relation is saved (thread safe) in a xml file, so rather than checking all *.csproj files on every commit, first the xml file called SolutionAssemblies.xml is checked. You should keep the SolutionAssemblies.xml empty as it is. The hook knows how to populate it correctly.
Considerations:
In order to get your unit tests successfully running and executing on the repo server, bear in mind that you should have installed everything that unit tests use to run our developers’ machines.
In our case we need to have installed MVC.NET, because some of the unit tests use *.dll files that MVC.NET contributes with its installation. Remember – if one of the unit tests fails, your commit is going to be rolled back.

The last configuration that must be done is to setup the calling of the pre-commit hook.
To do this:
i. in the hooks folder of your project on the SVN repo server create folder CodeCoverageHook and copy the content of our hooks’ application (PreCommitHook) bin\Debug|Release folder

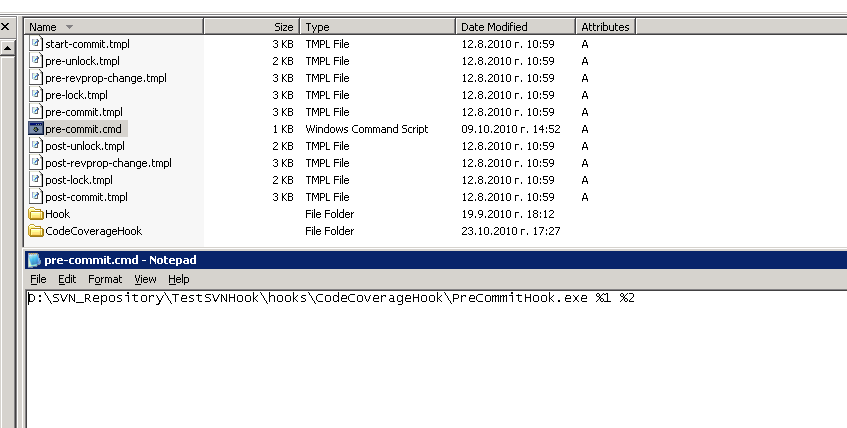
ii. Create pre-commit.cmd and call the executable of our hook
D:\SVN_Repository\TestSVNHook\hooks\CodeCoverageHook\PreCommitHook.exe %1 %2

Now you are ready to start using the hook.
Just for the record. We are using next performance tools:
vsperfcmd.exe, vsperfmon.exe, vsinstr.exe and mstest.exe
This means that you must have the performance tools of Visual Studio installed on the repo server.

Since all the assemblies that are used for the unit testing are copied only on building the test project(s), there is a way to avoid the code coverage checking with the latest version of the tests assemblies. That means that we can run unit-test which are not up-to-date, because the unit test project(s) might not be rebuilt. Well, I can assure you it is a matter of time your team leader to update the project and to run the tests or your continuous build to fail at the end of the day. That is why I didn’t go far and force rebuilding\copying assemblies of test project on every build in the solution.
NB: If you stuck with some exceptions when start using the hook don’t waste your time to try debugging it. Use the logged information from the log files to diagnose the problem and add more output to the log file with log4net if needed.

Also, I consider that in case of mass commit the right way to use the hook is to commit the files that belongs to assemblies which should not be checked for code coverage and after that to commit the files that will be checked according the content of codeCoverageSettings.xml. It is all because the running of unit tests and examining the results takes time, and you don’t want the commit of 30 files to fail, because of the policy violation, do you?

.NET solution details:

As you see the solution contains 2 projects – PreCommitHook and UnitTestsDistributor.
The first one is our hook application which runs on every commit and the latter is responsible for copying *.csproj files and the assemblies for unit tests on the repo sever in dedicated folders.
“MSTestCodeCoverage” folder contains the code related to running the tests via mstest.exe and examining the result. The methods of these classes are invoked in PreCommitValidator.cs. If you are only interested in running ms unit tests and examining their results, go and review these 3 files.

SVNHelpers classes are related to the getting data about committed files in the svn repository.
The Config folder contains all the xml files that we already reviewed above.

Both projects use log4net, so you can find the log files of the operations in the appropriate LogFiles\log-file.txt

Important: Copy the dbghelp.dll from ExternalAssemblies folder (part of the provided source code of this article) to your hook’s bin folder.
Finally, we are going to run again through the configuration steeps needed for setting up the hook and its helper application – the “mapper”. Some of the steps should be executed only by users who have access to the repo server.

1) Create needed folders: Go to the shared folder of the SVN repo server and create the folders: CodeCoverage, MSUnitTestsAssemblies, CSharpProjects. They all must be placed in a folder of your particular project (MVCDemo in our case). After you set the post-build events and place “NetMapper” folders in your solution physical folders, you should have mapped D:\ProjectsUnitTests\MVCDemo as X: drive. Don’t forget that this is configurable throught the app.config of “net mapper” console application. (step 3 below)

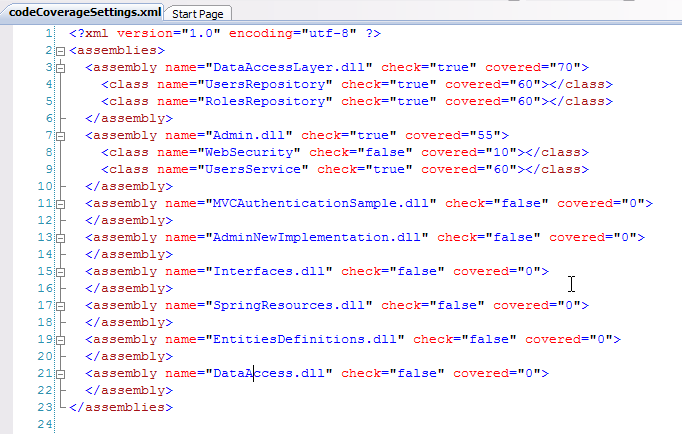
2) Configure needed files: your team leader (usually) must set the initial values of the conf files and to keep them up to date during the development process. The configuration files are: svnUsers.xml, codeCoverageSettings.xml, CommittedFilesPolicy.xml, emails.xml
Since I am reviewing the usage of the pre-commit hook with the source code of one of my articles Unit testing MVC.Net, below are the screen shots of the codeCoverageSettings.xml and CommittedFilesPolicy.xml filled according the needs of this project.


3) Network “mapper” folders – every developer should create the NetMapper folders on his file system and to put them inside the appropriate folder according the post-build events of the projects. If you are the first one who creates the settings, you should set also the post-build events as described earlier. Set up the app.config of the mapper application and put your svn account name. Configuration files of both applications in the solution should be synched up.

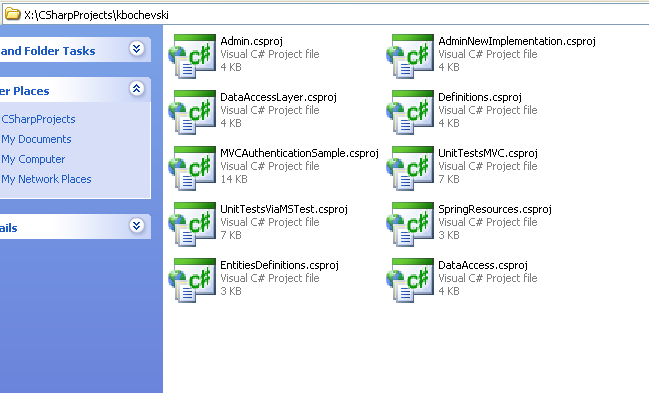
The screenshot below displays the content of the shared “CSharpProjects” folder. Every project file is copied to a folder named with your svn account after setting the post-build events (if not set already) and building the projects.

4) Go to the app.config file of the hook and set up your smtp server data and paths to the folders (those one from step 1. ). This should be done by user who has access to the repo server, since the hook is run on the repo server.
5) Go to the repo server and setup the hook’s invocation. Your hook’s folder should have similar content, once you are done with this step. NB: You should manually put dbghelp.dll to the bin folder of the hook!

The screenshot below shows how to call the hook on your repo server.

I advise everyone who decides to use the source code, to review it and optimize it according his needs. There is lots of room for improvements and also there are things that someone wouldn’t want to explore. Anyway I hope you will find something helpful.

The source code related to this article can be downloaded from here.


Read full article!

Jun 13, 2010

Unit testing MVC.Net

Covering MVC.NET loosely-coupled application with unit tests using Rhino.Mock and MvcContrib.TestHelper


In this post I am going to review how we can test our MVC.Net application layers in loosely-coupled application. In my last article I wrote about IoC with MVC.Net, so I will use this code as a baseline and will try to cover it with unit tests. Despite MVC.Net implies separation of concerns it doesn’t mean that such application is easy testable by default. Yet IoC helps us to define smaller isolated chunks which are quite more testable. When we talk about testing I have to say that few users click and running through the application for making sure that most visible errors are removed is not a testing…period. Unfortunately in lot of software development teams the testing is exactly what I pointed – going through product’s functionality and verifying that all visible (the most obvious) errors are fixed. In my opinion this approach may work in very limited scenarios, mostly for very small non complex applications. Everything beyond this “definition” is doomed to failure if you don’t go for automation testing. Today’s topic is about one part of the automation testing – unit tests. Unit-testing should aim at covering all of the application logic (or as much as possible :), something is definitely better than nothing). Every single method should be executed at least once to ensure that all code works correctly. When unit-testing, we should always test the smallest piece of testable software and we should able to run the tests continuously and in isolation from the “real” code and each other.
The major benefits of unit testing are facilitating the development process and the fact that they are kind of best documentation (from development perspective) for our logic’s implementation. During the development we either re-factor our code or we change it. If we have good unit-tests behind, it makes easier to figure out a deviation from the expected behavior during the changes.
What we have as isolated pieces in my PoC from previous post is: Business layer (Services), Data access layer (Repositories) and the MVC.Net layers (Models, Views, Controllers). In the PoC I have created I don’t use the model and in the real world my services should be a top layer addition to the domain logic based on the models, but it really doesn’t matter for the purposes of this article.

I want to test my code in isolation and here comes the Rhino.Mock mocking framework. As it comes to MvcContribl.TestHelper, it provides unit testing on MVC.Net controllers through mocking their internal members like Request, Response and Session. That makes it quite handy because without having all this out-of-the-box we should implement our mocks which in some cases may be a lot of work.

We have next dependencies which we’d like to mock in order testing in isolation:
• Controllers depends on the services which are injected with Spring.Net
• Services depends on repositories which are injected with Spring.Net
• Repositories depends on the database context which is injected with Spring.Net

Before I start reviewing these aspects I’d like to mention that I’ve spent the time to port my tests for both Nunit and MSTests. There are slight differences between their attributes and some assertions which technically can be overcome by using preprocessor directives which makes the same tests portable for both Visual studio and Nunit.
It might be something like that:

#if !NUNITTEST
using Microsoft.VisualStudio.TestTools.UnitTesting;
#else
using NUnit.Framework;
using TestClass = NUnit.Framework.TestFixtureAttribute;
using TestMethod = NUnit.Framework.TestAttribute;
using TestInitialize = NUnit.Framework.SetUpAttribute;
using TestCleanup = NUnit.Framework.TearDownAttribute;
#endif
Find below the difference in attributes between MS Test and Unit I used:
MS Test: TestClass -> NUnit: TestFixture
MS Test: TestMethod -> NUnit: Test
MS Test: ClassCleanup -> NUnit: TearDown
MS Test: ClassInitialize -> NUnit: SetUp

Now let’s see how we can achieve our goals for all this isolated parts of our application.
1. Repositories testing
Well, honestly mocking (isolating) the Linq to Entities data context in the context of its implementation in my baseline code was pain in the butt. Spring.Net injects the instance of AuthenticationDemoEntities in every repository. If I want to isolate it I have to create either brand new implementation which should be successor of the “real” database context or to create mock object wich should be able to replace runtime the “real” implementation. My IDBContext helped a lot here. Till now it was only a marker (bad practice LOL), but I added some contracts and did their implementations in the partial class of Linq To Entities context. Doing so I kept the code independent from generated code by Linq To Entities and in the same time I fed my contract properties by the “real” database model objects which made mocking possible. Of course I touched a bit repositories implementations, but it was a necessary change and affected few lines. So not a biggy.
Below are some screens which will give you better understanding of my idea. At the bottom of this article you can find a link to download article’s sample.

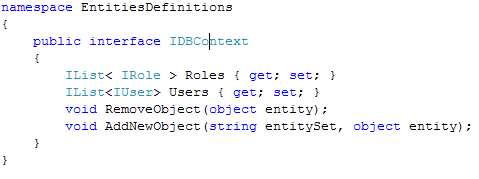
Database context objects feed my IEnumarable collections. RemoveObject and AddNewObject call the appropriate object context methods for manipulation of the data.

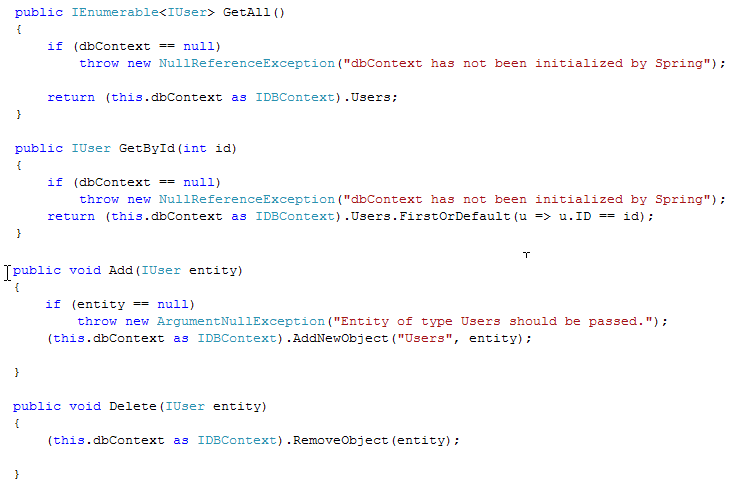
In the repositories classes now we use the explicit implementation of our contracts:

Having all this done, we can do the mocking and unit testing our data access layer in isolation.

Here is sample of testing a repository method by mocking Linq to Entities database context:

What I didn’t mention is my collection manager which simply cares about maintaining a dummy objects (which replaces the results returned by invocations against the database). I used Rhino mock for mocking my database contexts and recording mocks expectations.

Well, now we can test our repositories without touching the database. You can find repositories’ tests methods in RepositoriesTests folder in tests projects.
2. Services testing
When it comes to the services they rely on repositories implementations which are injected at run-time by Spring.Net.
The only thing we need to do in order to handle this dependency is mocking repositories which are used in services’ implementations.

You can find services’ tests methods in ServicesTests folder in tests projects.
3. Controllers testing
When it comes to unit-testing controllers in one MVC.Net application the helper frameworks may vary depending on controller’s implementations. If we use redirections, request, response and session objects MvcContrib.TestHelper is quite handy and gives many assertion methods. We can still disregard it and implement our mocks, but when it comes to the mentioned scenarios it may take a long time and development efforts for getting the result which can be achieved with few lines of code.
My code is very poor when it comes to the controllers’ implementations, so it didn’t really imply to using MvcContrib.TestHelper.

In my controllers’ test methods I went farther than just checking that action result is not null. Since I am using json result I wanted to test its properties too. For this purpose I serialized and de-serialized the result and made assertions against its properties depending on the tested scenario.
You can find controllers’ tests methods in ControllersTests folder in tests projects.
4. MVC routing
I did cover the MVC’s routing with test just to demonstrate how easy is to do this using MvcContrib.TestHelper. I don’t have any routes different from default one. In the RoutingTests.cs there are samples demonstrating it by using both mock and test helper library. And it is obvious that test helper library rocks here.

Consideration and projects dependencies:
Here is a list of dlls and projects dependencies which should be referred in our test projects:
• System.Runtime.Serialization – for seriazliing and de-serializing json results
• System.ServiceModel.Web - for seriazliing and de-serializing json results
• System.Web.Extensions - for seriazliing and de-serializing json results
• MvcContrib.TestHelper
• MvcContrib
• RhinoMock
• nunit.framework.dll – for running our tests with Nunit
• Microsoft.VisualStudio.QualityTools.UnitTestFramework.dll – for running our tests with MS Test
• System.Web.Routing
• System.Web.Abstractions
• System.Data.Entity

All external libraries can be found in External-Tests folder.
Beside the 3rd party libraries and system libraries we need next project reference: (technically every library we cover with unit-tests should be reffered)
• Definitions – contains interfaces contracts
• EntitiesDefinitions - contains interfaces contracts
• DataAccessLayer – contains the implementation of the repositories
• Admin – contains the implementation of services
• DataAccess – should be referred only because it is used for mocking data context.
• MVCAuthenticationSample – our MVC.Net application, which we refer to test routes

Debugging is quite easy with both MS Test and NUnit. To debug a test which is run with NUnit just put a breakpoint and attach to the NUnit process. Another feature that might be helpful is the code coverage tool. If you have the right edition of Visual Studio, which supports code coverage it makes sense to write your unit tests for VS. A good alternative (as none license-free can be called good) is NCover. Still the code coverage in my understanding can be both very powerful control mechanism and in the same time a bit misleading, so it should not be a measure for the quality of your code. We should agree that it is easy to generate unit tests with no assertions and we will have our code coverage despite it won’t bring any value.

Let’s see how our unit tests will alert us when there is a deviation from the code’s expectation.
Let’s say someone comments out one of ours ignore route rules and referring Scripts is not an ignore rule any longer.
//routes.IgnoreRoute("Scripts/{*pathInfo}");
If we run our unit tests we will get a failure instantly:

Now we have isolated tests which can be run independently and continuously.

You can refer my new article for designing loosely coupled MVC.NET 3 applications here.

Article related links:
MvcContrib MVC 1.1 containing MvcContrib.TestHelper
http://mvccontrib.codeplex.com/releases/view/33777
Rhino Mock
http://ayende.com/projects/rhino-mocks/downloads.aspx
NUnit
http://www.nunit.org/?p=download
You can download this article’s source code from here.
Database backup can be found in the repository for my previous article about IoC.
To start the tests with Visual studio create new test lists and add the unit tests.


Read full article!